Search This Blog

Wednesday, April 29, 2015

Unable to process the request . Wait a few minutes and try performing this operation again

Issue Description

Recently I came across this issue where some of the end users were getting an error message when they tried to open an Excel file in SharePoint in the browser.

Unable to process the request.
Wait a few minutes and try performing this operation again.

Unable to process the request 1

Cause

The Excel Services Application server computer is in a non-valid state and may need to be restarted.

Resolution

Most of the online articles were asking me to restart the Central Administration server.I did not want to do that and found a different fix.


Identify the application pool running the Excel Services service application (from IIS) and Recycle it.

1) Start �>Run �> inetmgr

2) Under the Sites click on SharePoint Web Services. This will list down the Services in SharePoint.

3) Click on each GUID �> Change the view from Features View to Content View

4) On finding ExcelService.asmx -> Right click that web service -> Manage Application -> Advanced Settings.

5) Identify the Application Pool (make a note of this).

6) Now in IIS �> Application Pools �> choose the Application Pool you noted down in previous step   -> Recycle (recycle the application pool).


Unable to process the request 2

Identify the Application Pool for a Service Application

1) Start �>Run �> inetmgr

2) Under the Sites click on SharePoint Web Services. This will list down the Services in SharePoint.

3) Click on each GUID �> Change the view from Features View to Content View

4) On finding SearchService.svc -> Right click that web service -> Manage Application -> Advanced Settings.

5) Identify the Application Pool (make a note of this).


6) Now in IIS �> Application Pools �> choose the Application Pool you noted down in previous step   -> Recycle (recycle the application pool).


Tuesday, April 28, 2015

Internal server error exception: System.NullReferenceException: Object reference not set to an instance of an object

Error Description

Recently I came across this error with SharePoint Search. I was searching in a SharePoint list and got the below error.
Error
Internal server error exception:
Troubleshoot issues with Microsoft SharePoint Foundation.

On checking the ULS logs I found the below entries

01/28/2015 10:59:51.10         w3wp.exe (0x31D8)                0x2030    SharePoint Server Search      Query      fm9a        Unexpected                CoreResultsWebPart::OnInit: Exception initializing: System.NullReferenceException: Object reference not set to an instance of an object.     at Microsoft.Office.Server.Search.WebControls.CoreResultsWebPart.SetPropertiesOnQueryReader()     at Microsoft.Office.Server.Search.WebControls.CoreResultsWebPart.OnInit(EventArgs e)               7001a8bf-b506-4096-b46b-003fbb5ec91b

01/28/2015 10:59:51.10         w3wp.exe (0x31D8)                0x2030    SharePoint Server Search      Query      g1j9         Exception                Internal server error exception: System.NullReferenceException: Object reference not set to an instance of an object.     at Microsoft.Office.Server.Search.WebControls.CoreResultsWebPart.SetPropertiesOnQueryReader()     at Microsoft.Office.Server.Search.WebControls.CoreResultsWebPart.OnInit(EventArgs e) System.NullReferenceException: Object reference not set to an instance of an object.     at Microsoft.Office.Server.Search.WebControls.CoreResultsWebPart.SetPropertiesOnQueryReader()     at Microsoft.Office.Server.Search.WebControls.CoreResultsWebPart.OnInit(EventArgs e)               7001a8bf-b506-4096-b46b-003fbb5ec91b


01/28/2015 10:59:51.10         w3wp.exe (0x31D8)                0x2030    SharePoint Server  Unified Logging Service       c91s        Monitorable                Watson bucket parameters: SharePoint Server 2010, ULSException14, 06175311 "sharepoint server search", 0e001b67 "14.0.7015.0", 17853a8f "microsoft.office.server.search", 0e001bd1 "14.0.7121.0", 531f1826 "tue mar 11 10:05:26 2014", 000032a4 "000032a4", 0000002d "0000002d", 4a6d3421 "nullreferenceexception", 67316a39 "g1j9"    7001a8bf-b506-4096-b46b-003fbb5ec91b


Solution 1

If you go into Central Administration -> System Settings -> Manage Services on Server. Make sure the below services are started.

- SharePoint Server Search
- Search Query and Site Settings Service

Solution 2

Click through all the Search Administration pages in Central Admin.Click through all the Search Administration pages in Central Admin. Now perform the search again. The issue should have disappeared.


Solution 3

Identify the underlying application pool for search (Reference)
Perform an application pool recycle

Wednesday, April 15, 2015

SharePoint Crawled Properties and Managed Properties

Last year, when I had an interview, I was asked the difference between crawled property and managed property. Though I have come across this multiple times and even after working on Search Project, I could not give a satisfactory answer.(honestly ,even for me the answer was not satisfactory)

So what is CrawledProperty and Managed Property in SharePoint ???

Crawled Properties and Managed Properties are very basic SharePoint concepts but they are building elements of SharePoint Search. Below is an example which might help you understand this in a better way.
SharePoint crawls data from different sources. The data in these various source systems have metadata which can have different names but it refers to the same information.

As an example different systems can store the information about the Author in various systems with the name as :

Author
Created By
Writer
Owner
and in case of emails it is stored in field From.

But all these fields represent the same information which represent who has created this.

Now when SharePoint crawl these various systems , all these properties become Crawled Properties.
In SharePoint we can group all these Crawled Properties under one Managed Properties.
The below image is a pictorial representation of what I said above.


Note

One crawled property can be part of multiple Managed Properties.
Managed property can be used in scopes, refiners..etc.

Tuesday, April 14, 2015

Cascading Drop-Down List in a SharePoint 2010 List

Cascading Drop-Down List in a SharePoint 2010 List
This post explains how to implement a Cascading Drop-Down List in a SharePoint 2010 List using jQuery and SPServices. To implement a Cascading Drop-Down List in a SharePoint 2010 List using jQuery and SPServices follow the below steps.

Steps

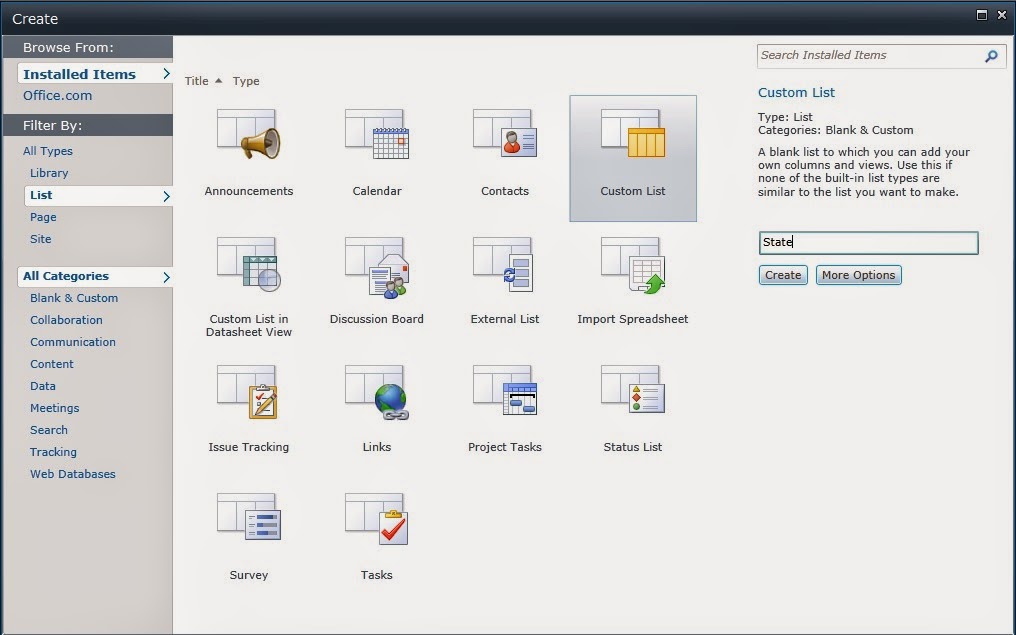
1. Create a Country custom list


Country List


2. Create a State Custom list with a Country lookup column.


Look up Column Settings


State List


3. Download the following jquery files and upload in your Sharepoint site in site Assets library in a folder named JSLibrary(Create the folder if is not present).

jquery-1.4.2.min.js
jquery.SPServices-0.5.7.min.js


4. Create a CascadeDropDownList with Country and State lookup columns.


5. Select the Default New Form under the List tab of the newly created List CascadeDropDownList.


6. Add a HTML Form Web Part and select Edit HTML Source under the Format Text Tab.


7. Copy and Paste the following code in the HTML Editor:

<script language="javascript" src="/SiteAssets/JSLibrary/jquery-1.4.2.min.js" type="text/javascript"> 
</script> <script language="javascript" src="/SiteAssets/JSLibrary/jquery.SPServices-0.5.7.min.js" type="text/javascript"></script> 
<script type="text/javascript"> 
  $(document).ready(function() { 
            $().SPServices.SPCascadeDropdowns({ 
                relationshipList: "State", 
                relationshipListParentColumn: "Country", 
                relationshipListChildColumn: "Title", 
                relationshipListSortColumn: "ID", 
                parentColumn: "Country", 
                childColumn: "State", 
                promptText: "Choose State...", 
                debug: true 
            }); 
}); 
</script>


SharePoint 2010 Error Message : The current page has been customized from its template. Revert to template

Error Description

Recently I noticed that there was message like this on a SharePoint site Home Page.

The current page has been customized from its template. Revert to template


The below steps hides this message and is not a fix

1. Edit the page in browser and then click on Add webpart, from media and content webpart select Content Editor webpart.

2. Then in the content editor web part Click on "Click here to add new content" to edit the contents of the web part.

3. In the Ribbon, go to the Format Text section, select HTML in the Markup group, and choose HTML Source.

4. Now paste the below code and save the page.

<style type="text/css">
    body #pageStatusBar{height:0px; font-size:0px; padding:0px; border-style:none;}
</style>

Monday, April 13, 2015

How to create a SharePoint State Service application through PowerShell

If you configure the SharePoint service applications manually and not run the configuration wizard, you will miss creating the State Service Application as it is not listed down as a service application option in Central Administration -> Manage Service applications page. ( This Service Application is not available for creation in the New dialog in Central Administration, Manage Service Application)

So it should be created through PowerShell. Below are the commands to create one :

$serviceApp = New-SPStateServiceApplication -Name "State Service Application"
New-SPStateServiceDatabase -Name "SharePoint_Service_State" -ServiceApplication $serviceApp
New-SPStateServiceApplicationProxy -Name "State Service Application Proxy" -ServiceApplication $serviceApp -DefaultProxyGroup


Friday, April 10, 2015

SharePoint Search Service Application Creation through PowerShell

Search service Application can be created and configured through Central Administration and PowerShell as well. The below commands creates the Search Service Application and the associated databases.Further configuration can be done from Central Administration. The main purpose of doing this is to create search related databases without GUID�s.

$SSADB = "SearchDB�
$SSAName = "Search Service Application"
$SVCAcct = "Domain\UserName"
$SSI = Get-SPEnterpriseSearchServiceInstance -local

1. Start Services search services for SSI
Start-SPEnterpriseSearchServiceInstance -Identity $SSI

2. Create an Application Pool.
$AppPool = New-SPServiceApplicationPool -Name $SSAName" AppPool" -account $SVCAcct

3. Create the SearchApplication and set it to a variable
$SearchApp = New-SPEnterpriseSearchServiceApplication -Name $SSAName -Applicationpool $AppPool -DatabaseName $SSADB

4. Create search service application proxy
$SSAProxy = New-SPEnterpriseSearchServiceApplicationProxy -Name $SSAName" ApplicationProxy" -Uri $SearchApp.Uri.AbsoluteURI

5. Provision Search Admin Component.
Set-SPEnterpriseSearchAdministrationComponent -SearchApplication $SearchApp -SearchServiceInstance $SSI

The database names would be as below by running the above PowerShell.

Administration Database: SearchDB
Crawl Database: SearchDB_CrawlStore
Property Database: SearchDB_PropertyStore

"Your local machine time zone does not match your current SharePoint regional setting" warning message in an Access web database in a SharePoint site

Error Description

When you open a Microsoft Access web database in a SharePoint site, you receive the following warning message: �Your local machine time zone does not match your current SharePoint regional setting. Operations involving dates will not work correctly�


Cause

This problem occurs because a different time zone is used in the regional settings of Windows and the SharePoint server.

Fix

To resolve this problem, follow these steps.
1. Identify the time zone setting in the SharePoint site to which the Access web database is published. To do this, follow these steps:

a. At the top of the SharePoint site, click the arrow next to Welcome <User name>, and then click My Settings.
b. On the User Information page, click My Regional Settings.
c. In the Follow Web Settings section of the Regional Settings page, make sure that the Always follow web settings check box is selected.
d. Check the Time Zone setting.

2. Set Windows and the SharePoint server to the same time zone. To do this, follow these steps:

a. Click Start, click Control Panel, and then open the Date and Time item.
b. In the Date and Time item, click Change time zone, and then select the time zone that is used by the SharePoint site.

Thursday, April 9, 2015

How to create a SharePoint Usage and Health Data Collection Service Application through PowerShell

Usage and Health Data Collection Service Application collects Data about Usage and Health of your farm. This information is used for Health Monitoring and this is also required for running the Web Analytics Service. If you do not have a Usage and Health Data Collection Service Application or your Usage and Health Data Collection Proxy is stopped, you will not see any data in the Web Analytics Report.

You cannot create Usage and Health Data Collection Service Application from Central Admnistration.
You have to use PowerShell for this :

New-SPUsageApplication -Name �UsageAppName� -DatabaseServer �DBServerName� -DatabaseName �DBName�

$Usage = Get-SPServiceApplicationProxy | where {$_.TypeName -eq �Usage and Health Data Collection Proxy�}

$Usage.provision()


SharePoint Service Accounts Required for a Mid-Size Farm

Below is a table which lists down the service accounts and their roles in a mid-size SharePoint farm.
This is just my personal recommendations based on my experience and the requirements my farm had. Based on the SharePoint features you use, you can have additional service accounts. You can run a farm with one service account also. But that would not be a Microsoft recommended practice.


Account Name
Role
Permissions needed
SP_SETUP
Setup Account. This account will be used to install SharePoint binaries
SharePoint Server : Local administrator on all SharePoint servers
SQL Server : dbcreator and securityadmin
SP_FARM
Farm account. This account will be used for Windows Timer Service, Central Admin etc.
SharePoint Server : Local administrator on all SharePoint servers
SP_WEB
This account will be used Application pool ID for  web applications

SP_APP
This account will be used  Application pool ID for  service applications

SP_SRCH
This account will be used  Application pool ID for  Search Service application

SP_CRWL
This account will be used as  Search Crawl account

SP_SUSR
This account will be used SharePoint Portal Super User account

Web application Policy : Full Control
SP_SRDR
This account will be used  SharePoint Portal Super Reader account

Web application Policy : Full read
SP_UPS
This account will be used as User Profile services account
Must have Replicating Directory Changes permissions to AD

SharePoint 2010: Event 7043 "Load control template file /_controltemplates/TaxonomyPicker.ascx failed"

Error Description

You install Microsoft SharePoint 2010 RTM on Windows 2008 R2, you receive the following error message multiple times in the application event log:

Event Type: Error
Event Source: SharePoint Foundation
Event Category: None
Event ID: 7043
Computer: SERVERNAME
Description: Load control template file /_controltemplates/TaxonomyPicker.ascx failed: Could not load type 'Microsoft.SharePoint.Portal.WebControls.TaxonomyPicker' from assembly 'Microsoft.SharePoint.Portal, Version=14.0.0.0, Culture=neutral, PublicKeyToken=71e9bce111e9429c'.


Error Cause

The ULS log is created in a code path where all control templates are loaded into the web application. This is a one-time process which happens just before showing any UI to the user after an IISReset.The source of the problem looks like a stale control template in the control templates folder while the control itself has been removed from the code base.

Fix

This is not causing any issues except for a wrong ULS log message a single time in a web application process life time, the exception is caught and that template file is skipped. This message should be treated as log noise and can be ignored.
1. Navigate to /14/TEMPLATE/ControlTemplates/TaxonomyPicker.ascx user control
2. Open the user control in a text editor and locate the first line
3. Find the character string &#44; and replace with a comma �,� (without quotes).
4. Save the user control


How to create a new content database for a web application

New-SPContentDatabase

The New-SPContentDatabase cmdlet creates a new content database and attaches it to the specified Web application.

New-SPContentDatabase [-Name] <String> [-WebApplication] <SPWebApplicationPipeBind> [-AssignmentCollection <SPAssignmentCollection>] [-AssignNewDatabaseId <SwitchParameter>] [-ChangeSyncKnowledge <SwitchParameter>] [-ClearChangeLog <SwitchParameter>] [-Confirm [<SwitchParameter>]] [-DatabaseCredentials <PSCredential>] [-DatabaseServer <String>] [-MaxSiteCount <Int32>] [-WarningSiteCount <Int32>] [-WhatIf [<SwitchParameter>]]

Example

New-SPContentDatabase "MyDatabase" -DatabaseServer "MyServer" -WebApplication http://sitename


Wednesday, April 8, 2015

Cache settings operations in SharePoint Server

SharePoint Server provides four types of caches that help improve the speed at which web pages load in the browser:

2. Page output cache
4. Anonymous search results cache

The BLOB cache is enabled and configured in the Web.config file in the web application to which you want to apply the cache. The page output cache and object cache are usually configured in the user interface at the site collection level. Certain settings for these caches can also be configured at the web application level. The changes that you make to the Web.config file will be applied to all site collections and sites within the web application, and will supersede any configuration made at the site collection level or below.


Note : To use the page output cache or the object cache, you must be using the Publishing feature on your site.

BLOB cache
SharePoint Server provides a disk-based cache that stores files that are used by web pages to help them load quickly in the browser, and reduces the load on the database server when it uses those files. These files are known as binary large objects (BLOBs), and the cache is known as the BLOB cache. The BLOB cache is stored directly on the hard disk drive of a front-end web server computer. The first time that a web page is called, these files are copied from the database to the cache on the server hard disk drive, and all subsequent requests for those files are then served from the hard disk drive cache of the server. By default, the BLOB cache is off and must be enabled to use the functionality it provides. When you enable the BLOB cache on your front-end web server, you reduce the load on the SharePoint Server database server created by read requests from web browsers.

Page output cache profiles
The page output cache stores the rendered output of a page. It also stores different versions of the cached page, based on the permissions of the users who are requesting the page. Page output cache settings can be configured at the site collection level, at the site level, and for page layouts. By default, the page output cache is turned off. The page output cache uses cache profiles that specify how long items should be held in the cache. You can specify different cache profiles to be used for anonymous and authenticated users, which optimizes the use of the cache based on the authentication methods that are allowed on the site. You can configure cache profile settings for a web application by editing the Web.config file on the application server. The cache profile settings that you configure at the web application level will be used for all cache profiles in the site collections for that web application.

Object cache
The object cache reduces the amount of traffic between the web server and the SQL database by storing objects - such as lists and libraries, site settings, and page layouts - in memory on the front-end web server computer. As a result, the pages that require these items can be rendered quickly, increasing the speed with which pages are delivered to the client browser. Object cache settings can be configured at the web application level, and at the site collection level. By default, the object cache is on at the site collection level. You can optimize the object cache for a web application by specifying the size of the object cache. Specifying a larger number can enhance performance for some large sites at the cost of memory on each front-end web server. You can configure other settings for the object cache at site collection level.

Anonymous search results cache

The anonymous search results cache is primarily used by publishing sites that allow access to anonymous users. It saves search results from anonymous users and reuses them for later queries that are the same as the original query. This improves performance on site pages that use the Content Search Web Part.

Configure object cache user accounts in SharePoint Server

The object cache stores properties about items in SharePoint Server. Items in this cache are used by the publishing feature when it renders web pages. The goals of the object cache are to reduce the load on the computer on which SQL Server is running, and to improve request latency and throughput. The object cache makes its queries as one of two out-of-box user accounts: the Portal Super User and the Portal Super Reader. These user accounts must be properly configured to ensure that the object cache works correctly. The Portal Super User account must be an account that has Full Control access to the web application. The Portal Super Reader account must be an account that has Full Read access to the web application.

Note:The Portal Super User and Portal Super Reader accounts must be separate accounts, and they must not be accounts that will ever be used to log in to the site.

In SharePoint Server, querying for items is linked with the user account that makes the query. Various parts of the publishing feature make queries for which the results are cached in the object cache. These results are cached based on the user making the query. To optimize the cache hit rate and memory requirements, the queries must be based on whether a user can see draft items. When a publishing control requests the object cache to make a query to get data for the control, the cache makes the query, not as the user making the request, but instead it makes the query twice: once as the Portal Super User account and once as the Portal Super Reader account. The results of these two queries are stored in the object cache. The results for the Portal Super User account include draft items, and the results for the Portal Super Reader account include only published items. The object cache then checks the access control lists (ACLs) for the user who initiated the request and returns the appropriate results to that user based on whether that user can see draft items. By adding the Portal Super User and Portal Super Reader accounts to the web application, the cache must store results for only two users. This increases the number of results that are returned for a query and decreases the amount of memory that is needed to store the cache.

Note: By default, the Portal Super User account is the site�s System Account, and the Portal Super Reader account is NT Authority\Local Service. There are two main issues with using the out-of-box accounts.

1. The first issue is that some items get checked out to System Account, so when a query that includes these items is made, the checked out version of the item is returned instead of the latest published version. This is a problem because it is not what a user would expect to have returned, so the cache has to make a second query to fetch the correct version of the file. This negatively affects server performance for every request that includes these items. The same problem would occur for any user who has items checked out, if that user�s account was set to be the Portal Super User account. This is why the accounts configured to be the Portal Super User and the Portal Super Reader should not be user accounts that are used to log into the site. This ensures that the user does not inadvertently check items out and cause problems with performance.

2. The default Portal Super Reader account is NT Authority\Local Service, which is not correctly resolved in a claims authentication application. As a result, if the Portal Super Reader account is not explicitly configured for a claims authentication application, browsing to site collections under this application will result in an �Access Denied� error, even for the site administrator. This error will occur on any site that uses any feature that explicitly uses the object cache, such as the SharePoint Server Publishing Infrastructure, metadata navigation, the Content Query Web Part, or navigation.


1. Create the super user account and super reader account

Create 2 normal domain accounts and call them :

domain\superuser
domain\superreader

You can configure the user accounts for the object cache by using Central Administration and Windows PowerShell. You must first create the accounts in the Central Administration website and then add the accounts to the web application by using Windows PowerShell. You must add the user accounts to each web application.


2. To add the user accounts by using Central Administration

The domain\superuser account needs to have a User Policy set for that gives it Full Control to the entire web application. In order to do this you perform the following steps:

1. Go to Central Administration
2. Go to Application Management
3. Go to Manage Web Application
4. Select the web application
5. Click User Policy
6. Add Users
7. Click Next
8. Fill in domain\superuser
9. Select Full Control
10. Click Finish

The domain\superreader account needs to have a User Policy set for that gives it Full Read to the entire web application. In order to do this you perform the following steps:

1. Go to Central Administration
2. Go to Application Management
3. Go to Manage Web Application
4. Select the web application
5. Click User Policy
6. Add Users
7. Click Next
8. Fill in domain\superreader
9. Select Full Read
10. Click Finish

Make note of how the names for the Object Cache Super Reader and Object Cache Super User accounts are displayed in the User Name column. The displayed strings will be different depending on whether you are using claims authentication for the web application.

3. To add the user accounts to the web application by using Windows PowerShell

$w = Get-SPWebApplication "http://<server>/"
$w.Properties["portalsuperuseraccount"] = "domain\superuser"
$w.Properties["portalsuperreaderaccount"] = "domain\superreader"
$w.Update()

If you are using claims based authentication run these cmdlets on one of your SharePoint servers:

$w = Get-SPWebApplication "http://<server>/"
$w.Properties["portalsuperuseraccount"] = "i:0#.w|domain\superuser"
$w.Properties["portalsuperreaderaccount"] = "i:0#.w|domain\superreader"
$w.Update()


Propellerads